How Can We Help?
VTC Hub API and External Driver’s Hub Integration
This article is extremely technical, use the API integration if you know what you are doing.
Trucky exposes Public API to read data massively but it’s possible also to receive realtime HTTP calls when something happens on the VTC Hub. You can use the API Webhook to integrate your External Drivers Hub or Discord bot.
Public API
API documentation is located here (https://e.truckyapp.com/api/docs).
There are public and private endpoints. To access private endpoints you need the Company Access Token that gives full access to the all Company Data, don’t share it and keep it private.
Your Company ID is exposed directly there and will be useful to construct many Endpoint URLs.
All endpoints returns JSON response and must be always used a custom User-Agent HTTP Header, for example your Company Name: empty usernames, default usernames are not allowed and will return always HTTP error code 403.
Is highly suggested to set also Content-Type and Accept HTTP Headers to application/json .
To claim a Company Access Token, go in Company Settings, then API tab and click on the “Claim API Company Access Token” button.


It will appear here. Copy it and keep it private!

Using the Company Token
The Company Access Token must be sent via HTTP Header “x-access-token”, below few examples using common programming languages:
var myHeaders = new Headers();
myHeaders.append("x-access-token", "<TOKEN>");
myHeaders.append("Accept", "application/json");
myHeaders.append("Content-Type", "application/json");
myHeaders.append("User-Agent", "Trucky VTC");

var requestOptions = {
  method: 'GET',
  headers: myHeaders,
  redirect: 'follow'
};

fetch("https://e.truckyapp.com/api/v1/company/<company_id>/jobs", requestOptions)
  .then(response => response.text())
  .then(result => console.log(result))
  .catch(error => console.log('error', error));
<?php
$client = new Client();
$headers = [
'x-access-token' => '<TOKEN>',
'Accept' => 'application/json',
'Content-Type' => 'application/json',
'User-Agent' => 'Trucky VTC',
];
$request = new Request('GET', 'https://e.truckyapp.com/api/v1/company/<company_id>/jobs', $headers);
$res = $client->sendAsync($request)->wait();
echo $res->getBody();var client = new HttpClient(); var request = new HttpRequestMessage(HttpMethod.Get, "https://e.truckyapp.com/api/v1/company/<company_id>/jobs"); request.Headers.Add("Accept", "application/json"); request.Headers.Add("User-Agent", "Trucky VTC"); request.Headers.Add("x-access-token", "<TOKEN>"); var content = new StringContent(string.Empty); content.Headers.ContentType = new MediaTypeHeaderValue("application/json"); request.Content = content; var response = await client.SendAsync(request); response.EnsureSuccessStatusCode(); Console.WriteLine(await response.Content.ReadAsStringAsync());
import http.client
import json

conn = http.client.HTTPSConnection("e.truckyapp.com")
payload = ''
headers = {
  'Accept': 'application/json',
  'Content-Type': 'application/json',
  'User-Agent': 'Trucky VTC',
  'x-access-token': '<TOKEN>'
}
conn.request("GET", "/api/v1/company/<company_id>/jobs", payload, headers)
res = conn.getresponse()
data = res.read()
print(data.decode("utf-8"))
Members Management via API
Trucky offers to manage your members from an external Drivers’ Hub using two write endpoints for adding and removing members.
These two endpoints require authentication via the usual X-Access-Token HTTP Header parameter.
Keep in mind the Steam ID is always mandatory to communicate members adding or removal to Trucky.
Caveats:
- The Steam ID is validated against Steam Web API
- You cannot add to your company a user that is already in another Company in Trucky. The user must leave the other VTC by their own
- New member is added without Role, you have to assign a Role from Trucky Application UI
API Documentation is available here
Webhooks
If you want to receive realtime updates feeding your personal Driver’s Hub, you may use the API Webhooks integration.
In this example we’ll use a local webserver exposed with Ngrok

Depending on which language your website is based on, generally speaking, you must expose an endpoint, let’s say https://yoursite.com/trucky/webhook, that accepts HTTP POST calls.
Every call has the same structure, it’s a JSON object containing an event property telling you what kind of event you are receiving and a data property containing the webhook data.
{
  'event': 'job_created',
  'data': { ... }
}
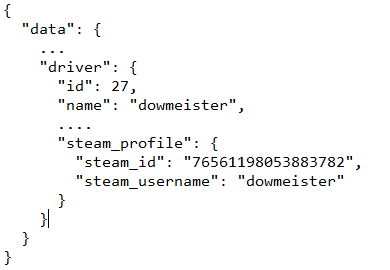
When the data property contains a user reference, you can find always also attached a steam_profile property to it, containing steam_id and steam_username so you can map the event to a driver on your system. You can eventually store the Trucky User ID associated to your local user, it will never change.

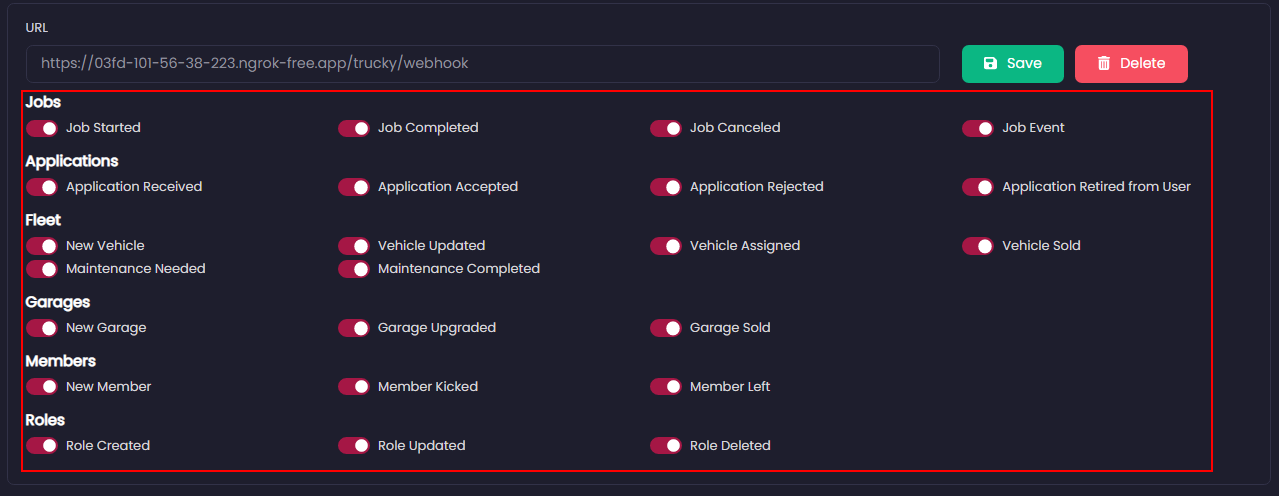
Like Discord Integration, you can choose to receive webhook calls based on what you want to track on your side

Available event types are:
Jobs related:
- job_created : fired when a job is started
- job_completed : fired when a job is completed
- job_canceled : fired when a job is canceled in-game
- job_event_created : fired when a job event has been registered
- job_deleted : fired when a job is deleted from the database (logically or permanently)
Members related:
- member_kicked : when a member is kicked from the company
- member_left : fired when a member leave the company (also fired after member_kicked)
- user_joined_company : fired when a new user is added to the company (also fired from application_accepted and when new members are synced from TruckersMP)
- member_role_assigned : fired when the member change role
Fleet management:
- vehicle_created
- vehicle_deleted
- vehicle_updated
- vehicle_assigned : fired when the vehicle is assigned to a new driver
- vehicle_need_maintenance : fired when the vehicle needs maintenance (maintenance must be started assigning an AI Mechanic from Trucky)
- vehicle_maintenance_complete : fired when the vehicle completes the maintenance
Garage related:
- garage_created
- garage_deleted
- garage_upgraded : fired when new places have been purchased
Applications related
- application_created
- application_accepted : fired when the application is accepted
- application_rejected : fired when the application is rejected
- application_retired : fired when the user retire their application from your company
Roles related
- role_created
- role_updated
- role_deleted
Verify Webhook Call
You can verify the webhook call validating the X-Signature-SHA256 HTTP header signed in HMAC SHA256 with a secret key.
Obtain the secret key from the API tab in Company Settings.

Be aware you will see the Secret Key only one time so, when generated, copy it in a safe place and keep it securely.
Althought thi is not mandatory, it’s highly suggested to use a Secret Key: external Drivers’ Hub platforms could request it as additional security measure to validate data coming from Trucky.
The whole payload is hashed.
Below an example on how validating it in NodeJs and ExpressJs app:
var express = require('express');
var app = express();
var crypto = require('crypto');

// this is important, you must validate the Raw Body and not the body parsed already in a JSON object
var bodyParser = require("body-parser");
app.use(bodyParser.json({ verify: function (req, res, buf) { req.rawBody = buf } }))

const hmacSecret = '<YOUR SECRET KEY>';

app.post('/trucky/webhook', (req, res) => {
    const hmacHeader = req.header("X-Signature-SHA256");
    const hash = crypto
        .createHmac('sha256', hmacSecret)
        .update(req.rawBody)
        .digest('hex')
    if (hash === hmacHeader)
        console.log('Authorized, webhook call is legit');
    else
        console.log('Unauthorized');
})
app.listen(8080, () => {
    console.log(`Example app listening on port 8080`)
})
Laravel Integration – trucky/webhook
We have prepared a small package for simple Laravel Integration leveraging the internal Events system, available here
Examples
Curious about you can use the Webhook integration?
Here there is a small and quick example implementing a Discord Bot that receives events from Trucky.
Looking for a Drivers’ Hub Provider?
Trucky is officially integrated with CHub, here the integration guide
